Quick Guide to Developing Run
Control Enabled Applications
3/27/03
Selim Tuvi stuvi@slac.stanford.edu
Disclaimer: The reader of this
document is assumed to be familiar with object-oriented programming and the
Python programming language.
Introduction to RunControl:
The following is a
screenshot of the Run Control graphical user interface:
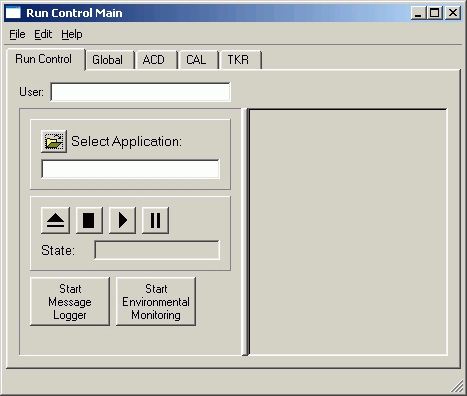
After Run Control is
launched either using the icon located under the ‘GLAST I&T Online’ program
group in the ‘Start’ menu or using the provided batch file ‘runcontrolmain.bat’
the operator is presented with the above application. The first thing the
operator needs to do is enter his/her user name in the provided text entry box.
The next optional step is to
check or change the preferences by choosing ‘Preferences” from the ‘Edit’ menu.
The following dialog will display:
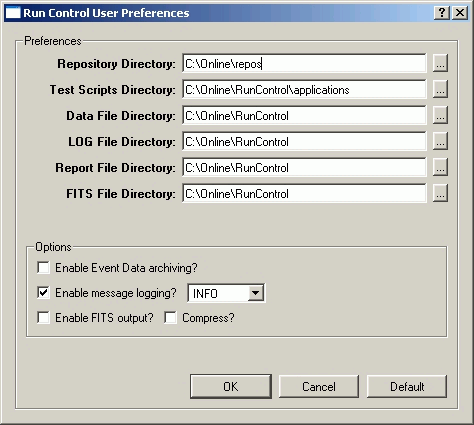
This is where the user can
change file input/output locations and to enable/disable certain options.
After this the operator can
select the test application by clicking on the select application (![]() )
button to the left of the “Select Application”
)
button to the left of the “Select Application”
After the application is
loaded the Run Control framework is put in the ‘RESET’ state. The framework
uses a finite state machine to go through the different transitions. The state
and transition diagram is shown below:

At this point the
application can be started by clicking on the start (![]() )
button. The Run Control framework will automatically ask the operator to load a
schema. This allows the same test application to be run with different schemas.
)
button. The Run Control framework will automatically ask the operator to load a
schema. This allows the same test application to be run with different schemas.
Depending on the application
![]() )
or pause (
)
or pause (![]() )
buttons. If the pause button is clicked, the application can be resumed by
clicking on the play button again. If the stop button is clicked, the test
application can be restarted by clicking on the play button or reset by clicking
on the reset (
)
buttons. If the pause button is clicked, the application can be resumed by
clicking on the play button again. If the stop button is clicked, the test
application can be restarted by clicking on the play button or reset by clicking
on the reset (![]() )
button.
)
button.
The mapping between the
transitions and the methods that needs to be defined in the test application are shown in the following table:
|
Transition |
Method
call |
|
Teardown |
teardown() |
|
Setup |
setup() |
|
Start run |
startRun() |
|
Stop run |
stopRun() |
|
Stop |
stop() |
|
Pause |
pause() |
|
Resume |
resume() |
Writing a Pyhon program that conforms to the RunControl
framework:
For facilitating the
learning a sample application called “testAppEvt.py” that
is located in the RunControl/applications directory
will be used. Some code from that application may be omitted here to simplify
things. Some of the code here is optional and should not be assumed that all
applications have to be coded the same way.
A Run Control enabled
application always defines a class named “userApplication”
which inherits from “rcTransitions”.
There are three parameters
passed to the __init__ method:
- gui: The main RunControl
user interface object.
This object is mainly used if you have additional GUI components (such as userArgument) inside your application and you need to specify a parent when you instantiate them. This object also has a preferences() method which returns a dictionary of options currently set for the session. If running the application in standalone (non-GUI) mode this parameter value should be None. - userId: The userId of the
operator running the application.
- debug: Specifies if the operator is running Run
Control in debug mode.
The __init__ method is
responsible for initialization of the application components. Usually this
involves setting up event and command synchronization threads if any are
required. Here is a simple __init__ method:
def __init__(self, gui, userId, debug):
rcTransitions.__init__(self, gui,
userId, debug)
log.debug("userApplication.__init__()")
self.__eventSem = threading.Semaphore(0)
self.__cmdSynchSem = threading.Semaphore(0)
if
gui is None:
self.__arg = userArgText()
else:
self.__arg = userArgument(gui, 'test1', 1)
In the above example first
the base class __init__ method is called to initialize the Run Control
framework. Then logging is done to record that the init method has been
executed. After that two semaphores are declared to control the synchronization
between the triggering of the events and the processing of the events. The
reason for this is that at the beginning of the run, Run Control creates an
event handler thread which is used to call the application’s process()
method for each incoming event and if the application is doing its own
triggering with the glt.CMD_SELF_TRIGGER command
it needs to have a way of controlling the processing so that all event handling
will complete before the next event comes in.
The last block of code in
the __init__ method initializes the object responsible for asking the user how
many events are desired. If the gui is supplied then the GUI dialog can be shown
otherwise a console input is done.
def getName(self):
return
__name__
The above method is used to
return the name of the application. This value is used as the “TestName” in the test report. In the above example it
defaults to the application source name (without the .py).
def setup(self):
log.debug("userApplication.setup()")
tem = self.lat.downTEM(0)
if tem is not None:
# clear TEM stats reg
tem.COMMAND_RESPONSE = 0
# clear TEM status reg
tem.STATUS = 0
# enable
tem.DATA_MASKS = 0x10FF
# TEM config reg #
set TEM timeout
tem.CONFIGURATION = 0
# A state transition can be
rejected by not returning None
return
None
The setup() method is called
by the Run Control GUI when the “Run” button is clicked. This is done after the
schema is selected and loaded by the operator. At this point Run Control has
loaded the application and the schema and has connected to the command and
event servers. The self.lat object contains a pointer
to the LAT hierarchy. In the setup() method you can put your hardware initialization
code or other things you need to do before the event data taking starts. By
returning a value other than None in this method you can notify RunControl that something is wrong and that you don’t wish
to continue.
def startRun(self):
log.debug("userApplication.startRun()")
cnt = self.__arg.getValue("Enter
number of triggers to take")
#~ self.glt.OPTIONS = 0xA05
self.glt.DESTINATION = 5
self.glt.MARKER = 0
self.glt.ZERO_SUPPRESS = 1
self.glt.FOUR_RANGE_READOUT = 0
self.glt.TACK = 1
self.glt.CAL_STROBE = 0
# Spawn a thread to synchronize commands with events
# This must happen after triggers are enabled
self.__cmdSynchQuit = FALSE
cmdSynch = threading.Thread(None,
self.__commandSynch, 'CmdSynch',
(cnt,))
self.__cmdSynch = cmdSynch
cmdSynch.start()
# A
state transition can be rejected by not returning None
return
None
The startRun()
method is where the operator is asked of any runtime specific parameters such
as the number of events to take.
This is also a good place to
setup GLT for triggering and to spawn a thread that will actually do the
triggering. As you can see the argument(s) inputted by the operator can be
passed to the commanding thread for use by that thread.
As in the setup() method
Run Control system can be notified of an error condition by not returning None.
def stopRun(self):
self.setCompletionStatus(self.COMPL_STATUS_SUCCESS)
self.__cmdSynchQuit = TRUE
self.__eventSem.release()
self.__cmdSynch.join()
The stopRun()
method is called when the operator clicks on the “Stop” button. The main thing
to do here is return a completion status. This status is recorded in the test report and can be one of
the following:
COMPL_STATUS_UNDEFINED = -1
COMPL_STATUS_ABORTED = -2
COMPL_STATUS_ERROR = -3
COMPL_STATUS_SUCCESS = 0
In addition to the above the
event triggering thread should be terminated by setting a flag and releasing
the event thread semaphore. The last line which calls the join() method on the
thread forces the execution to wait until the thread terminates.
Now let’s take a look at the
process()
method:
def process(self, (status, buffer)):
"Method called back for each data event taken"
if
status == 0:
evtCli = self.evtCli
print "Event Size =", evtCli.evt_size
print "Event Status =", evtCli.evt_status
ts = evtCli.evGetTimestamp()
print "Event Timestamp (GMT)=", asctime(gmtime(ts)), \
"and", int(modf(ts)[0]*1000), "ms"
contList = evtCli.getContributionList()
for
cId in contList:
evtCli.setCurrentContribution(cId)
if
cId.startswith('TEM'):
evtCli.evDumpSummary()
evtCli.evDumpCAL_LogAccepts()
evtCli.evDumpCAL_Logs()
elif cId
== 'ACD':
evtCli.evDumpSummary()
evtCli.evDumpEventAEM()
# Get next event triggered
self.__eventSem.release()
Each time an event is
received by the Run Control system the process() method is called. The
parameters passed to the method are status which should be checked before calling the event
parser routines, and the buffer which contains the event datagram. The reason
status and buffer is passed in as a tuple is to
maintain backward compatibility with the old test programs where buffer was the
only expected parameter.
The event client object is
exposed as self.evtCli and this object can be used to call the event
parser routines as shown above. Please refer to the event client documentation
for more information on these routines.
Finally in order for the
triggering to resume the event semaphore should be released.
Command synchronization
thread:
The typical way of
triggering an event and processing the event in the same python application is
to use threads. In this case the event thread is taken care of in the Run
Control framework but unless the events are externally triggered, a command
synchronization thread is needed:
def __commandSynch(self,
count):
"Method called by the command synchronization
task"
import
time
glt = self.glt
eventSem = self.__eventSem
# Drain the semaphore release count
# Handles the case when the stop run release
collided with a trigger release
while
eventSem.acquire(0): pass
t0 = time.time()
cnt = 0
while
cnt < count and not self.__cmdSynchQuit:
cnt += 1
glt.CMD_SELF_TRIGGER = 1 # Issue an
internal trigger
eventSem.acquire() # Wait for the event to be processed
dT = time.time() - t0
if dT
== 0.0: dT = 0.000001
log.info("%s processed %d events in %.3f seconds = %.1f
events/second" % \
(self.getName(), cnt, dT, self.evtCnt/dT))
# Get out of waiting when in standalone mode
self.sync()
It is required to make sure
that the event semaphore is decremented back to zero. Since these are counting
semaphores, each release() would increment the count
and each acquire() would decrement the count. The while eventSem.acquire(0)
loop drains the semaphore count back to
zero in case there have been more than one releases by stopRun() and
process().
The thread starts by
entering a while loop that is conditioned to exit when the trigger count equals
the parameter specified by the user or when the quit flag is set.
Inside the loop it
increments the local counter, initiates the trigger and then does an acquire() on
the event semaphore to wait for the event to be received and processed. This
ensures that the process()
method finishes its event processing before another trigger can be issued.
After the loop exits it is
up to the script to log whatever it wants or do some needed cleanup.
Finally if the application
is running in standalone mode, meaning that the script is being run outside the
Run Control GUI, the
application has to make sure the thread has completed its processing. The
standalone mode code calls the following routines to wait until the thread
completes:
def wait(self):
self.__cmdSynchSem.acquire()
def sync(self):
if __name__ == "__main__":
self.__cmdSynchSem.release()
Standalone Mode:
At certain times it may be
desirable to run the test application without a GUI present. In such cases the
following needs to be added to the test application:
# Standalone mode:
if __name__ == "__main__":
log.basicConfig()
log.getLogger("").setLevel(log.DEBUG)
ua = userApplication(None,
321, 0)
ua.rcSetup('../repos/simpleTemSchema.xml')
ua.rcStartRun()
ua.wait()
ua.rcStopRun()
ua.rcTeardown()
Since the application is not
governed by the GUI certain extra processing needs to be done. The first thing
is configuring and initializing the logger.
Then test application is
constructed by passing it None for the gui,
and then the user id and debug mode. Note that none of the preferences will be
in effect since it is being run in standalone mode. A future release should
mirror all the functionality of the GUI mode by adding additional methods.
Then Run Control functions
are used to guide the application through the usual transitional steps.
Because of the limited
functionality of the standalone mode it is strongly advised that the
applications are executed this way for debugging purposes only.