Click on ![]() to return to start of page
to return to start of page
Preliminaries
Table of Contents
First, if using Visual C++ 6.0, make sure you have Service Pack 5 installed.
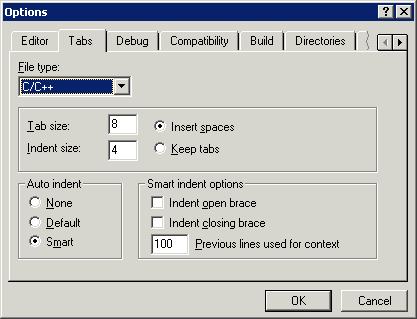
Next, set your tabs so that spaces are inserted rather than tabs. See the Tools->Options Menu:

Please see the following instructions:
http://www-glast.slac.stanford.edu/software/CodeHowTo/enable_vsnet.htm
Modifying a package and checking it back into the repository
![]()
To modify and then check in changes made to a package, you must start with the HEAD revision of the files in the package. The easiest way to do this is to checkout the HEAD version of a package and assign it a higher revision number than what is currently being used by your application.
For instance, suppose your current installation uses the v1 version of heavy. You want to make changes to this package. You shall check out the HEAD version of heavy. You will, however, have to put this package in a directory structure that CMT understands, such as v1r1/ or v3r6/. Using cvsweb check what the latest tagged version of this package is, then increment it one to get the version you should use. Assuming that v1 is the latest tag of heavy, we shall therefore assign our checked package to a directory called v1r1. Now check out the package as follows
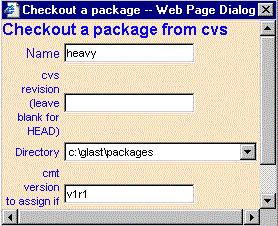
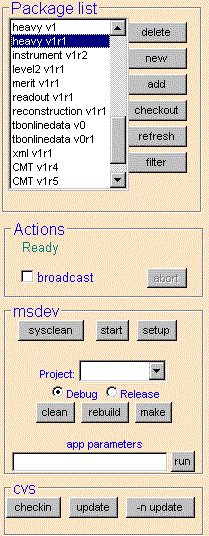
Click the checkout button and select the package you want. Leave the cvs version blank to get the HEAD revision. Choose the CMT version to assign (in this case v1r1)

If you have control over the entire code installation then you can do the checkout described above alongside the other packages. If, however, you are working with a central installation (which you don't want or aren't allowed to modify) and only want to edit the one package then you should use the above checkout procedure in your own personal space. You then need to add this space to your CMTPATH (which you would have done while you set up VCMT you can check it here).
In either case the purpose of checking out heavy to a directory called v1r1 is the same: CMT will now use your v1r1 copy of heavy, rather than the v1 copy of heavy that came with the central installation. You can now edit your copy of heavy as you please.
Once you have finished your changes you will want to rebuild the application to test your changes. If you have control over the whole installation this is simple: simply follow the instructions given in Building the Code on Windows and Unix . If, however, you do not have control you will want to check out your own copy of the application package (for instance gsim) into your own personal space. You can then use this package to build and run the application (you can check that here).
Once you've tested your code you'll want to check it back into the repository (specifically you'll be checking the code into the HEAD of the MAIN branch). You do this as follows
Select the package you've modified and want to check in.
Now click on the button marked "checkin"

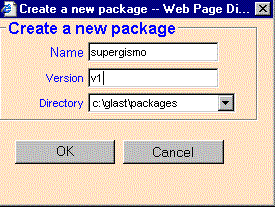
Click the command "new" next to the package list. The dialog box below then appears. Fill in the name for your new package, as well as the initial version number. You can also choose among your CMT paths as to where to put the package.

The new package will have two directories: cmt and src. The src directory will be empty and the cmt directory will contain a skeleton requirements file. This requirements file only specifies the package name; all the rest you need to fill in yourself.
Checking a new package into repository
![]()
A preliminary step is to add a file called ".cvsignore" to the root of the package you wish to check in. This file will specify which directories cvs is to ignore when importing. This is so that cvs does not import the directories like Win32 or sun4x_56, which only contain libraries and executables (which should not be in the repository). It should also exclude the setup and make files that may have been created during the testing phase.
Suppose you have a new package called "newPackage" (with initial version v1). You would need to create a file newPackage/v1/.cvsignore that had the following lines as its content
sun4x_*
i386_linux*
Win32*
Visual
setup.*
*.mak*
You can create the file with your favorite editor.
Next check the new package into the repository using these instructions
Click on the cvs "import" button and follow any instructions
The software group maintains a package called Admin, whose purpose is to assign the ownership of each package, as well as define which packages are checkout packages. The package contains two files
package_ownership_list.txt - This is a list of the used CMT packages, as well as the owner of the package.
checkout_package_list.txt - This is a list of the CMT checkout packages.
Updating the Admin package
If you add a new package to the repository, you should update the Admin package to reflect this. You'll need to update the HEAD of Admin, so use vcmt can be used to checkout the HEAD on Windows. The format of the files is simple and should be self-explanatory.
It is possible to use an external library with an application that is built using CMT. To do this you need to create a CMT package that will serve as an interface between CMT and the external package. Such a package is called a glue package.
The first step then is to create a package . The package name should make clear which external library it refers to (i.e. the package CLHEP is a glue package for the CLHEP library). It is also useful if the version of the glue package corresponds to the version of the external library (i.e. the CLHEP glue package has version v1r5 to correspond to the 1.5.0.0 release of the CLHEP library).
The next step is to edit the requirements file for your glue package so that CMT will be able to find the include files and libraries. Shown below is the requirements file for CLHEP. We shall go through how things need to be set
package CLHEP
version v1r5
use EXTLIB v2r2
include_path "${CLHEP_DIR}/include"
public
set CLHEP_DIR "${EXT_DIR}/CLHEP/1.5.0.0"
macro CLHEP_linkopts "${CLHEP_DIR}/CLHEP/libCLHEP.a" \
VisualC
"${CLHEP_DIR}/lib/Clhep.lib"
The first step is to specify the base directory of your external library
(in this case CLHEP_DIR). In general, it is hoped that all external
libraries used for GLAST code reside in the same directory, which is specified
by the environment variable EXT_DIR. The EXT_DIR variable is set in the
EXTLIB package which has been done in the setting up the external libraries step;
it is therefore necessary to include the EXTLIB package with the "use"
command.
Using the variable specifying where to find the external library you now set the include and linking paths. The "include_path" command specifies where to find the include files. The "CLHEP_linkopts" command specifies where the external library is; simply replace "CLHEP" with the name of your interface package. Notice that for the default for CLHEP_linkopts is "libCLHEP.a", but on a Windows system it is set to "Clhep.lib". In this way you can customize your glue package so that it works on both Unix and Windows.
Some Not-So-Routine Operations ![]()
Last Modified January 21, 2003
Back To Main Menu Previous Step Next Step